

Monday, October 7, 2019
Fall Movie Marathon 2019
Our weeks have become very busy this year, so much so that whenever we have a teeny bit of downtime we try to rest as much as possible. We are movie fanatics and love to spend a cozy fall afternoon cozied up on the sofa with a big bowl of popcorn watching one of our favorite fall flicks.
It’s easy to look at fall and just think about spooky movies that focus around halloween, but there are so many other good ones that fall into the fall category that aren’t at all spooky and totally family friendly. We are all currently obsessed with Wonder and have watched over and over again!
What are some of your favorite flicks to snuggle up to in the fall? We’d love to hear about them!

Monday, September 30, 2019
How We Saved $400 in a Month

We are clearly in the thick on parenting and babies which keeps us pretty busy when we’re not getting busy. Yep. I just said that. It’s no secret. With lots of babies comes lots of things to drain our money like activities, clothes, food, etc etc etc. We make it a priority to be as frugal as possible in the areas we see fit. Sure, we could save probably more than what I’ve titled this blog post, but we choose to spend money in areas that may not be a priority to others and that’s okay. Where we save money, may be an area where someone wants to spend a little more. To each their own! But if you’re in the trenches of life and finances are getting the best of you, maybe sharing how we save can help you save.
Here we go! Four ways to save big...

1) Satellite TV. Over the summer we decided to cut the cord on our satellite tv package. We did this when we were first married because we were always working and never home. Now we’re home, but still not watching tv enough to make it worth shelling out $120 just for cable. Truth be told we stream Netflix more than anything and will subscribe to Disney’s new streaming platform once it’s available. We still like having access to a few of our favorites so we opted for SlingTV for as low as $25 a month. Doing this over the summer for us made it so much easier since there weren’t a lot of shows on anyways. There are also other options depending what fits you best like Hulu, Philo, PlayStation Vue, YouTube TV and DirecTV Now, but overall if you’re looking to save ditching the cable is a big one!
**Check out this article to learn and compare different services. HERE
2) Spending Freeze Week. If you’re not familiar with Jordan Page, she’s is queen of savings and the one whom we adopted this concept from. Nearly every month we plan for a week where we freeze all our spending. That means no eating out, no grocery shopping, no home shopping, no clothing shopping, nothing....unless there’s an emergency, but it has to be a legitimate emergency like running out of diapers or one of the kids is sick sort of thing.
**Learn more about Jordan Page on her site Fun Cheap OR Free
3) Dining Out Freeze Week. Depending what our schedule looks like this week saves us from our lazy-I’m-tired-and-I-don’t-want-to-cook-because-the-kids-have-been-driving-me-crazy days. Let’s be real, grabbing lunch out, stopping at the coffee shop, ordering dinner, going out for ice cream all adds up quickly! These two weeks (spending freeze & dine out freeze) can be huge savings!
4) Create a budget. This was a foreign concept to us 5 years ago. We were scared of feeling like we couldn’t spend any money on anything, but that’s the lie that keeps so many people from creating a budget and finding freedom in their finances. A budget doesn’t mean you can’t spend money, it allows you to spend money; money that you are comfortable and able to spend.
We adapted the envelope cash system and love it. It’s been a huge blessing for us and has helped stay on track. Please know we are by no means perfect and we have months where we slip, but the there’s always a new month and you start over. We created different categories for our needs (grocery, home improvement, going out, etc) and place the cash into each category. Once the cash is gone for the month, it is gone. Anything leftover gets to go into our savings where we use for trips or use for Christmas.
Need to make a little extra? Start shopping your house for items you no longer use and put them up for sale. Clothes, toys, furniture, framed art are all easy to sell items. This is an easy way to bring in a little extra cash and set aside for fun things to do with the family or set it aside and save for something you’ve been needing or wanting without ever feeling like you’re breaking the bank!
Thursday, September 26, 2019
Fall Bucket List 2019

It’s the first week of fall and we’re already crossing items off our bucket list! We get so excited for this time of the year as it’s always so fun and magical! Here’s what we’ve come up with for this glorious fall season...

Tuesday, September 10, 2019
Playroom Makeover

The playroom is the one room that has gone through the most makeovers. In the last 5 years it’s been painted four times. If you remember we’ve done the chalkboard wall, gray and white stripes, plain white and now this deep aqua color. I love changing up a room even if it’s multiple times for a couple reasons...
1) painting a room is one of the most inexpensive ways to completely change a space and
2) I truly believe your home should always be evolving with your style.
1) painting a room is one of the most inexpensive ways to completely change a space and
2) I truly believe your home should always be evolving with your style.
Prior to this weekend the playroom was painted a shade of white with a lot of white furniture. It’s safe to say white is my safety net because anything can go with it, but all the white on white was boring me and I needed a change. Cue a few of my favorite IG accounts, one in particular, Chris Loves Julia. In their last house they painted their den a beautiful dark and moody color and added accents of wood. It was gorgeous and I knew the playroom would be the perfect room to do something similar. This room has a large double window with lots of natural light and white colored furniture to pop.

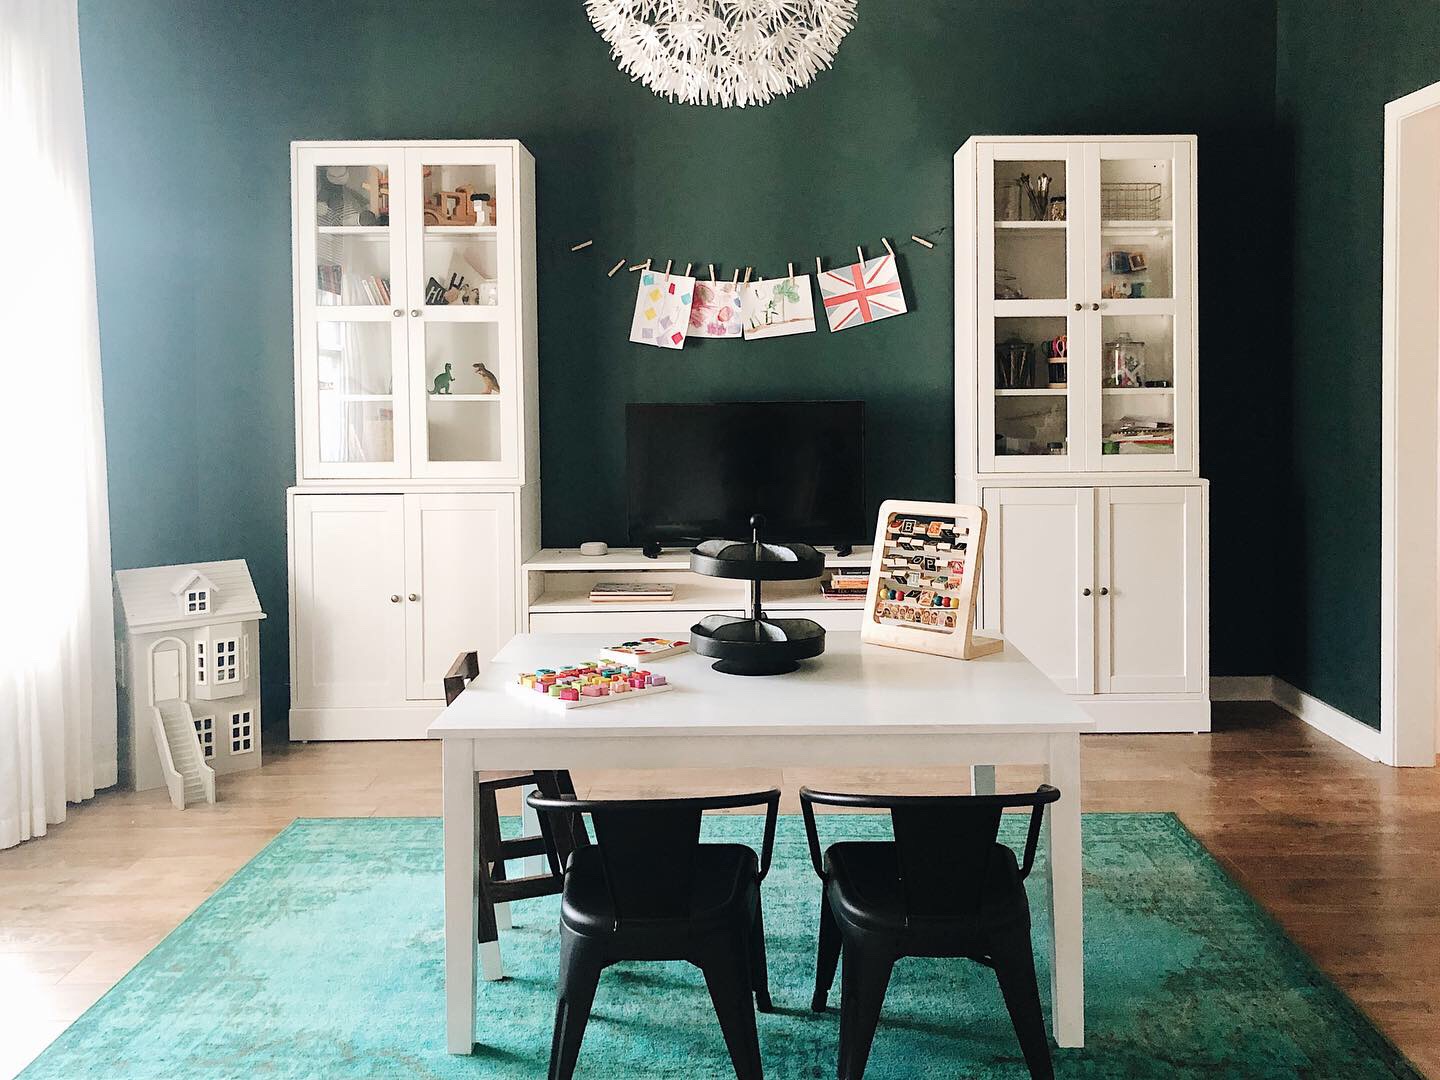


I absolutely love how our white furniture pieces pop against the new color. The cabinets we purchased from IKEA over the summer have become the focal point of the room, but they’ve also created so much storage for us. It houses so many of our playroom favorites including all our art supplies, block sets, puzzles and games. I planned to share more about our playroom favorites, but since I want to share more specific items with you I’m going to save that for its own post.
To completely finish the room we’re ordering an additional set of chairs and on the hunt for a different rug to bring in a little more contrast. The kids are definitely looking forward to more seating, but more than anything they love how this room has become more and more of a space for them and I’m excited to create a space they love!
\Sources\
Wall Color \ Sherwin Williams Still Water
Glass Door Cabinets \ IKEA
Play Kitchen \ Pottery Barn Kids
Rug \ Rugs USA
Chairs \ Target
Sunday, August 25, 2019
Never Say Never

This past week was a big week for us, Kensington started first grade! However, we are going against everything we’ve been taught and know. We started our homeschooling journey, something I said I would NEVER do! Do you have any idea how many times I’ve eaten that word, never? My mom always told me ‘never say never’ and you would think I would have learned, but I haven’t. I don’t think we ever do when we feel so sure about something. My mom and I laughed about it on the phone this week. She asked me what other things I said ‘never’ to and I thought I’d share...
- I would NEVER play basketball again after being horrible at it in 7th grade. I lack hand-eye coordination, trust me ask my hubby, but I somehow managed to make the team two years in a row in high school
- I would NEVER move out of Nebraska. We have moved out of state twice, once to Maryland days after we were married and then to North Carolina.
- I would NEVER marry a guy named Mike or Michael because there were too many in our family. This is just laughable because we began dating in high school.
- I would NEVER homeschool annnnnnd here I am!


But God’s plan is ALWAYS so much better than our plan.


I know we’ll have hard days. I know we will have days I’m going to lose my freakin’ mind and I’m going to want to throw the towel in and say forget it! But this past week, our first week, I have felt so much peace and I don’t doubt this is exactly what we’re meant to be doing. I have no doubt we were led to this exact place, with these exact neighbors, to our exact church with amazing mentors, to do this exact thing. I know I found my people and it looks so much different in every way I ever imagined it would be and it’s so good, because He is so GOOD.
Tuesday, August 6, 2019
10 Screen Free Activities

We are fully enjoying summer both outside with lots of water play and beach time as well as inside when we’re bombarded with thunderstorms. Sometimes those afternoons that force us to stay indoors can lead to a lull in activity and the kids will often come to me saying they’re bored. I love an afternoon inside because it forces me to clean and get things organized, but it doesn’t work too well for the kids. Instead we have some of their go to favorite activities to do all summer long, but they really come in handy when the rain comes to visit and will also work well in the afternoons for after school in the fall.
1. Iron Beads | Hobby Lobby is our go to place for bead packs, character sets and pattern books. All three of the kids love making these and because it’s a meticulous task it takes up time.
Check out these sets HERE.
2. Watercolor Painting | This is pretty easy to do for all aged kiddos and its not super messy. This is one thing we will pull out while I’m prepping dinner. We have the individual water color palette trays along with tubes of concentrated water color paint found HERE. The concentrate prevent the kids from turning all the colors brown in a tray, but they are a little more messy.
3. Puzzles | All the kids really enjoy putting puzzles together. We have a variety of chunky puzzles, matching puzzles, floor puzzles and difficult puzzles. For our harder puzzles that have 50 or more pieces I designate it a number and then write that number on the back of every piece. This way when one pieces gets missed in clean up and is found later, we can easily identify which puzzle set it goes to. I also like ditching the boxes to most puzzles because they’re bulky and instead cut the picture off the box and store them in a resealable bag.
4. Play Dough | Play dough is always a huge hit and its super cheap! We have two bins for our play dough: one for the actual dough and one for all the tools. This also works great when the kids are sick and we add a drop of Thieves essential oil onto the dough and as they squish it they’ work the oil into it. It definitely helps combat the germs.
A new favorite all natural play dough we love is Land of Dough. We have a few of these and the dough is the softest dough ever! It’s also made with essential oils which we love! OR we will make our own and add our own oils.
5. Sensory Table. | If you don’t have a sensory table or bin you need to invest in one. This works great for both dry and wet play. We will often use rice, beans or even kinetic sand and bury dinosaurs, princesses, army men, magnetic letters....you name it, you can throw
it in there and have the kids hunt for the different items with measuring spoons and cups. For Kensi I’ll have her search for letters to spell sight words or make up a math sentence. Sensory tables are perfect for messy play too. Let the kids explore with baking soda and vinegar, practice washing their play dishes in soapy water, or even play with something squishy like jello!
We have THIS table from Crate & Kids. We’ve had it for a few years now and it’s so sturdy for outside play. We have had sand starch the bottom, so I wouldn’t recommend large grain sand. IKEA also has a super cute and budget friendly option!
6. Classifying Objects. This is so simple and perfect during dinner prep! We have some manipulatives such as bugs and animals that come in different sizes and colors and they work perfect for sorting. You could easily use colored cereal like Fruit Loops, colored pasta, mini erasers, beads, paper scraps, etc. The kids will sort them by size, color, order or family. This can be made as simple or as difficult as needed based on the child’s ability.
This printable color mat is great for younger kids like Finn and Olivia. (Linked below) Kensington likes to write lists and draw pictures, so for her she may grab her animal book and classify them by what they eat or if they’re a mammal or reptile.
Color Printable from Alyssa Dawson Blog
7. Cook Together. | This works every single time. Choose a recipe and cook together. This also works well when I’m prepping dinner and they’re ready to lose their minds! Give them something to do whether it’s helping mix or measure. They get so excited about helping and being part of the process!
8. Art | We make a lot of art at our house. A lot. There isn’t a day where there aren’t scrap pieces of paper scattered on the floor. We love using lot of different materials including scented markers, stamp markers, DOT Markers, colored pencils, glitter gel pens, crayons, Chunky paint sticks and stamps.
Also, those paper mâché animals from target and Hobby Lobby are so much fun to paint!
9. Building Forts | Forts can drive me crazy, but the kids love them and it will entertain them for hours. We usually build them over tables to prevent the sheets from falling. The kids will bring all their special things inside and play all afternoon.
10. LEGOs. | I’ll have to keep LEGOs in a designated play area shortly because Etta will soon be on the move, but LEGOs are another toy that will keep the kids busy. Sometime we’ll grab a handful of LEGOs and challenger each other to build different things like a car, monsters, house or airplane.

1. Iron Beads | Hobby Lobby is our go to place for bead packs, character sets and pattern books. All three of the kids love making these and because it’s a meticulous task it takes up time.
Check out these sets HERE.
2. Watercolor Painting | This is pretty easy to do for all aged kiddos and its not super messy. This is one thing we will pull out while I’m prepping dinner. We have the individual water color palette trays along with tubes of concentrated water color paint found HERE. The concentrate prevent the kids from turning all the colors brown in a tray, but they are a little more messy.
3. Puzzles | All the kids really enjoy putting puzzles together. We have a variety of chunky puzzles, matching puzzles, floor puzzles and difficult puzzles. For our harder puzzles that have 50 or more pieces I designate it a number and then write that number on the back of every piece. This way when one pieces gets missed in clean up and is found later, we can easily identify which puzzle set it goes to. I also like ditching the boxes to most puzzles because they’re bulky and instead cut the picture off the box and store them in a resealable bag.
4. Play Dough | Play dough is always a huge hit and its super cheap! We have two bins for our play dough: one for the actual dough and one for all the tools. This also works great when the kids are sick and we add a drop of Thieves essential oil onto the dough and as they squish it they’ work the oil into it. It definitely helps combat the germs.
A new favorite all natural play dough we love is Land of Dough. We have a few of these and the dough is the softest dough ever! It’s also made with essential oils which we love! OR we will make our own and add our own oils.
5. Sensory Table. | If you don’t have a sensory table or bin you need to invest in one. This works great for both dry and wet play. We will often use rice, beans or even kinetic sand and bury dinosaurs, princesses, army men, magnetic letters....you name it, you can throw
We have THIS table from Crate & Kids. We’ve had it for a few years now and it’s so sturdy for outside play. We have had sand starch the bottom, so I wouldn’t recommend large grain sand. IKEA also has a super cute and budget friendly option!
6. Classifying Objects. This is so simple and perfect during dinner prep! We have some manipulatives such as bugs and animals that come in different sizes and colors and they work perfect for sorting. You could easily use colored cereal like Fruit Loops, colored pasta, mini erasers, beads, paper scraps, etc. The kids will sort them by size, color, order or family. This can be made as simple or as difficult as needed based on the child’s ability.
This printable color mat is great for younger kids like Finn and Olivia. (Linked below) Kensington likes to write lists and draw pictures, so for her she may grab her animal book and classify them by what they eat or if they’re a mammal or reptile.
Color Printable from Alyssa Dawson Blog
7. Cook Together. | This works every single time. Choose a recipe and cook together. This also works well when I’m prepping dinner and they’re ready to lose their minds! Give them something to do whether it’s helping mix or measure. They get so excited about helping and being part of the process!
8. Art | We make a lot of art at our house. A lot. There isn’t a day where there aren’t scrap pieces of paper scattered on the floor. We love using lot of different materials including scented markers, stamp markers, DOT Markers, colored pencils, glitter gel pens, crayons, Chunky paint sticks and stamps.
Also, those paper mâché animals from target and Hobby Lobby are so much fun to paint!
9. Building Forts | Forts can drive me crazy, but the kids love them and it will entertain them for hours. We usually build them over tables to prevent the sheets from falling. The kids will bring all their special things inside and play all afternoon.
10. LEGOs. | I’ll have to keep LEGOs in a designated play area shortly because Etta will soon be on the move, but LEGOs are another toy that will keep the kids busy. Sometime we’ll grab a handful of LEGOs and challenger each other to build different things like a car, monsters, house or airplane.
Monday, June 24, 2019
A Princess Rapunzel Birthday

I will forever cherish planning each of our kids’ birthday parties. Every year they get so excited to begin planning and watching their ideas and vision come to life is pure magic.
This year Kensi wanted an Adopt a Princess party where her friends would each adopt a princess Itty Bitty. When we were shopping for the princesses we discovered Hallmark discontinued many of the plush dolls last December and it left us to find a different option. Kensi wasn’t even bothered by it and turned her focus on creating her party around her favorite princess, Rapunzel, and took much inspiration from the movie Tangled.
In true Kensi fashion she planned to have each of her friends paint their own paper lantern to replicate the floating lights in the movie. I seriously adore her style. We found concentrated water colors and the girls had so much fun painting their lanterns. Some painted pictures, while others painted patterns and rainbow designs. They turned out so cute! For the favor bags we were able to find enough keychain princess Itty Bitties in place of Kensi’s original plan and instead of adopting a princess, we simply added them to each guest's favor bag, along with a couple other fun treats.
Keeping our decor minimal with a white backdrop, we added pops of pinks, purples and gold to make her party come to life. We strung purple streamers from the ceiling that we dyed ourselves. It created a fun water colored ombre look that tied in perfectly with the water colors we used to paint the lanterns. We arranged a few different types of flowers in simple mason jars, added in copper twinkle lights and decorated the floor with scattered gold confetti filled balloons.
We had Whole Foods make her cake again this year and as always they nailed it! We went with a chocolate-raspberry filled cake and vanilla buttercream. They decorated it with the purple ombre effect and added in yellow for the floating lights. It was delicious and there was no cake left over which never happens. Kensi absolutely adored it and it may be my favorite cake her thus far!


\SOURCES\
Cake | Whole Foods
Paper Lanterns | Amazon
Portable Balloon Pump | Amazon
Balloons | Amazon
Streamers | DIY
Water Colors | Target
Paintbrushes | Hobby Lobby
Tablecloth | Amazon
Flowers | Trader Joes
Crown | The Wishing Elephant
Saturday, April 27, 2019
Laundry Room Renovation

Well, hello there beautiful! You gorgeous and functional laundry room, you! I’m so in love with how this space turned out and I can’t believe we let it go this long before we took on this project. Granted, we’ve been saving to do these bigger projects and even though I would have loved to have this done a few years ago, I can deeply appreciate the time, patience, sweat and tears that went into it. Yes, tears, there were tears due to the washing machine leaking all over the floor and going into the wall and staining our living room ceiling. There were tears when our AC in the attic leaked into the laundry room ceiling and we came upstairs to go to bed only to find water running out of the light fixture. This room has been the cause of multiple headaches that pushed this supposed month long project into a year, but we have finally walked through the process and we’re on the other side and completely in love with the finished results!
This space was as cookie cutter as it could get. Linoleum floors, flat paint, wire shelf, weird drain location and irritating water pan. It was crazy basic. Our laundry room is on the upper level of our home which is why our builder installed a water pan underneath the washing machine. About a month of moving into our home five years ago, our hand-me-down top loading wash machine leaked and I didn’t know. The water was sitting in the pan underneath the machine, but some of it also went under the pan, leaked around the unsealed drain (amateur plumbing) and went into our living room ceiling. It was a nightmare for a new homeowner. We had a plumber, contractor and drywaller all here within hours. I was most upset about the water pan because 1) it wasn’t installed properly 2) the drain wasn’t installed properly 3) our warranty guy tried to blame us for the damage because technically they’re not required to put a water pan in, but they did it anyways to be nice, athough we never requested one. A total nightmare. So our goal was to get rid of the water pan as soon as possible. We could have taken it out completely from the get go, but because the drain wasn’t properly installed or sealed it was not a project we wanted to take on until we were ready to make a big change.


We moved the drain over to be centered between the two machines and tiled the floor with penny tile. We initially planned to put subway tile up the entire back wall, but opted not to after looking at our overall budget and other projects we wanted/needed to take on in the house. I”m actually really happy with the decision to shiplap the entire room. It adds texture and keeps it simple without being boring. We decided to build a box around the machines in order to create a folding space on top. This is by far the BEST decision! Before the tops of our machines were constantly cluttered and there was zero room to fold anything. Now I can fold as I pull the clothes out of the dryer and it eliminates clothing piles for the kids to step over, trip on and ultimately cause me to refold again.
We added an upper cabinet for storage. Finished the space off by adding crown and adding two open shelves for easy access to our laundry essentials. I love having my products on open shelves, but I also like them to look pretty. Using glass jars and baskets help keep everything organized and pleasing to the eye. I especially love having cute little accent pieces in this space like the framed flower print I found at an antique store in Southport.
At one point we debated painting the crown molding black for a nice contrast. I loved the idea, but after dealing with multiple water leaks in different ceilings we were ready to just be done with this space and kept it simple and white. We may paint them later, who knows! Laundry can be such a chore and I actually spent quite a bit of time in this room so I wanted it to be pretty and a place I enjoyed. I love the details we added into this room. Now if I can just be more diligent about putting all the laundry away!
Here’s the space before.

\\ Sources \\
Wall Paint \ Super White Benjamin Moore
Trim Paint \ Super White Benjamin Moore
Cabinet \ Lowes Home Improvement
Penny Tile \ Home Depot
Stain \ Minwax Early American
Shelf Brackets \ Amazon
\\ Decor Sources \\
Flower Species Print \ Vintage
Rope Basket \ Target (similar item)
White Enamel Caddy \ Hobby Lobby
Jars \ Target
Lantern \ Target (similar items)
Towels \ Pottery Barn & Target
Wednesday, March 6, 2019
Simple Cakes

Today I’m sharing two very simple cakes, one of which is my favorite chocolate cake. Both of these recipes came from my mom and beyond that, I’m not quite sure where she learned them. We’ve been making the chocolate ganache cake for as long as I can remember. The key to this cake is the coffee and ganache frosting. I’ve had many versions of this cake and they’ve missed the flavor mark and I truly believe it’s due to the coffee which brings out the cocoa.
The lemon citrus cake is a new recipe for me, however it’s been one my mom has had in her massive recipe book for years. I love the tangy citrus flavor and it can be even stronger by adding 4 drops of Lemon Vitality essential oil. I think this cake would be the perfect addition to a spring dinner, summer BBQ or even to celebrate Cinco de Mayo in just a couple short months!


Chocolate Ganache Cake
2 cups flour
2 cups sugar
1 cup butter (2 sticks)
1/4 cup Dutch cocoa
1 cup strong coffee
1 tablespoon vanilla
1/2 cup buttermilk* (see note)
2 teaspoons baking soda
2 eggs
Preheat oven to 400 degrees F. Grease the bottom of a jellyroll pan.
In a mixing bowl, mix together flour and sugar and set aside.
In a small saucepan melt butter. Add cocoa, coffee and vanilla into melted butter and mix well.
In a 2 cup measuring cup, measure out 1/2 cup buttermilk and add the baking soda to the buttermilk. Stir together and let sit for 5 minutes until it begins to foam. Then add 2 eggs into the buttermilk and whisk together.
Mix all wet ingredients into the flour and sugar mixture and mix well.
Pour into greased jelly roll pan and bake at 400 degrees F for 20 minutes or until center springs back.
Remove from oven and let cool before adding ganache.
Ganache
3/4 cup heavy whipping cream
1-1/2 cups dark chocolate chips
In a small saucepan bring whipping cream to almost a boil then remove from heat and add chocolate chips. Stir until chocolate is melted and smooth. Pour ganache over the cooled cake and spread evenly. The cake can then be placed in the refrigerator to set the ganache.
*NOTE: If you do not have buttermilk , mix 1-½ teaspoon white vinegar with enough milk to make ½ cup. Let stand 5 minutes and then add the baking soda.

Lemon Citrus Cake
1 pkg. lemon cake mix
1 pkg. lemon flavored gelatin (JELLO)-small pkg.
4 whole eggs
¾ cup water
¾ cup vegetable oil
Mix batter according to package directions using above ingredients.
Grease bottom of a jellyroll pan. Pour cake batter into pan and bake 350 degrees 25 minutes.
Drizzle with powdered sugar icing (recipe below) and sprinkle with lemon, lime and grapefruit rind.
OR pour into a greased bundt cake pan (use Crisco to grease pan then dust with flour. Bake according to bundt cake recipe on the cake box. Cool 15 minutes and turn upside down onto a cake plate. Dust with powdered sugar when cool.
Powdered Sugar Icing
3 cups powdered sugar
Juice of 2 lemons
Enough water to create desired consistency.
Wednesday, January 2, 2019
Welcoming the New Year

Welcome to 2019! We are happy to welcome the new year and not all that upset to say goodbye to 2018 because when we look back on it, it was a struggle of a year for us. Filled with stress, anxiety, challenges and hardships, but we made it through and we are so much stronger for it and for that we are grateful for this past year. We learned how to rely on each other, how to ask for help, hot to simplify, how to say no to more and how to prioritize. We aren’t fools, we know there was good that happened in 2018 too, like expecting a new baby, making our health a priority, building our Young Living business and focusing more on our relationships with Christ and with each other. We had a lot of good happen, but those tough times we experienced were so hard and we’re ready to move forward.


There’s a lot we want to accomplish this year and we’re not really setting them up as resolutions because those never seem to really hold up, but we know we want to be more intentional about certain things.
- With our fourth babe arriving soon we want to get back to planning our weekly date nights, whether that’s getting out of the house or staying in.
- We want to grow our Young Living business because it’s been life changing for us and we want that for everyone we know.
- Take on less projects and plan more for our family.
- Simplify our home by decluttering and organizing as much as we possibly can.
- Continue to improve our health as a family.
Mike and I have really enjoyed the tradition of choosing a word for the new year and I can’t remember what I chose last year because I let myself get so far off track focusing on it, but this year I chose two words: unapologetic + optimistic. I realize I often allow myself to feel guilty saying no to projects and people and I’m often left exhausted and frustrated. I’ve also been so drained and stressed this past year that I’ve become pretty pessimistic, even though I like to call it being a realist. It’s being a pessimist and I hate that so I’m choosing to change it. Mike’s word for the year is fuel. He often chooses a word that applies to several different faucets in his life. Fuel for his soul by growing deeper in his relationship with Christ, fuel for his body through healthy eating and exercise and fuel his mind by learning something new. He likes to be complex and deep!
I’d love to know what you do for the New Year, are you the resolution type? A one word type? Or just plan on eating more tacos?
Subscribe to:
Posts (Atom)
