

Saturday, July 29, 2017
Choosing Floors
We’re deep into the process of flooring and have been for several weeks. Choosing a floor is much more difficult than we had ever anticipated. There are so many choices, it can be overwhelming. I’m breaking down our process and sharing what questions we asked and what we learned through our experience. Bear with me, this may be long-winded.
Types of Flooring
Since our home is built on a concrete slab we’ll share the flooring options we researched and considered for our home. There are more options out there such as hardwood and tile, but for the sake of our budget and type of home we have, we chose to stay within the following products.
Engineered Wood: Instead of being made with solid planks of wood, engineered wood is made of three layers of wood (plywood and wood) while the top layer is a hardwood veneer. Engineered wood is very stable and can withstand high heat and moisture. It can scratch and dent, however because it is made of real wood, this product can be refinished, but the number of times it can be refinished is limited. This is also a great choice if wanting to sell your home since it can add value and may help a home sell quicker. There are a few things to consider, engineered wood is not the most environmentally friendly and has toxins in the stains and topcoats. Since it is also engineered, it does contain adhesives in the product. Lastly, if a portion of the flooring becomes damaged it can be difficult to repair. $-$$$
Laminate: This product is made of five layers of different materials such as plywood or MDF core. However the top layer is merely a print to resemble the look of a natural surface such as wood, but the texture can vary. Laminate has a bottom water proof layer making it a great choice for almost any home or room. It is resistant to mold + bacteria and is also very durable to scratches, scuffs and even light. Since this is a man-made material it can be created using compounds that derive from formaldehyde, which can cause health concerns especially when using a low quality material. It’s suggested to use a premium laminate and to look for products that have a minimum 20 year base warranty. $-$$$
Luxury Vinyl: This product is becoming more and more popular and people are choosing this product over wood and laminate because it’s water, stain, scuff and scratch resistant. Perfect for basements, bathrooms or homes that can easily flood. This product has no wood elements whatsoever, but made from PVC. Although this product is extremely durable, there are characteristics to consider. Such as the VOC emissions. Several companies have reduced the amount of PVC used to make the vinyl planks, however low end products can contain high amounts and it is something to consider since long term exposure may cause health concerns over a long period of time. This product also may have a marginal effect on resale value for a home. $-$$
Tuesday, July 25, 2017
Back to School Style

This is our first year going to school and we’re very excited about it! Yes, the whole experience is bittersweet especially for a parent, but it’s pretty awesome to watch our baby grow and get to experience new things. Kensi is so excited to make new friends and learn new concepts and her excitement makes us excited. We decided to hold her back a year, so she’s going to PreK which we think is the best fit for all of us, but we still have quite a bit of summer left before her first day.
We recently looked up her classroom supply list and we hit up Target shortly after all the school supplies were stocked to get the best picks. Kensi picked out her favorite backpack and asked for a fun princess lunch box with all the fixings just so she was totally ready for school. She’s been trying her stuff on for the last week or so and then very carefully puts it all away back in the coat closet where is hangs neatly on her hook. I’ve also been picking up some back to school clothing for her and I have to admit the styles are so adorable this year and I cannot wait to see her rocking her favorite pieces.
Kensi is all about rainbows this year so it was natural for her to fall in love with this backpack. It’s the perfect size for her and the clouds are super soft! We also love shopping at small online shops and we’ve picked out a few pieces from three different favorite go to shops. This is the first time we’re trying Ryan & Wren’s clips and I think they’re going to be perfect for both Kensi and Olivia this fall. I also love shopping at Remi Girl and Alice & Ames for the sweetest and most soft dresses. Kensi absolutely adores these dresses and can’t get enough! Lastly, Hen&Co recently released this adorable Make a Wish sweatshirt. I think it’s the perfect addition for every child going back to school. I love creating a fun and whimsical wardrobe for Kensi and I think she’s going to have an absolute blast at school this year!
Friday, July 21, 2017
DIY Anthro Inspired Ornaments

I know it’s not anywhere close to Christmas yet, I also know many people really don’t want to think about it, but we spend one day celebrating Christmas in July every year so it’s been on our minds. We had quite a bit of paint leftover from Kensi’s birthday party and although her and Finn have painted several times since, and while in the craft store last week we spotted the clear plastic bulbs already on display and thought it would be fun to make our own Christmas bulbs for our tree this year. I struggle trying to find the perfect color combination of ornaments. I love having bright and whimsical touches on our tree, but finding the right colors seem either expensive or non-existent. Everyone who knows me, knows how much I love the colored Anthropologie latte bowls. I adore everything about these bowls and used them as inspiration to make the perfect whimsical colored ornaments for our tree.

Supplies
Clear Plastic Round Bulbs (Hobby Lobby)
Acrylic Paint (colors of your choice)
Painters Tape
Plastic Cups
The paints I had on hand were all purchased earlier this year from Target. I love the color choices offered as they all go well together. The kids and I (and Mike!) made our ornaments one afternoon before dinner. We removed the metal tops from each bulb, poured half the container of paint inside and taped the top opening shut. Then came the fun part! Shaking it up! Shake the ornaments until the paint covers the inside.
The kids LOVED shaking the bulbs and watching the paint roll and cover the entire inside of each bulb. When the paint was a little thicker I added just a few drops of water to thin it out. Also, when in doubt and it seemed some of us couldn’t get the paint to cover a spot or two, we handed it to Mike. His manly muscles did just the trick!

Once the inside is coated, remove the tape and place the bulb upside down in the plastic cup. Let it sit over night as it will allow any excess paint to run out. The next day, flip the bulbs over, keeping them in the cups to finish drying. We let ours dry for a few days. Once dry, replace the metal tops and string with a hook or a pretty satin ribbon.
No more hunting all season for the perfect set of colored bulbs or breaking the bank! It’s a fun project for the kids, even if it’s still summer. This project can also be done closer to Christmas season. It’s a great way to keep the kids busy while wrapping the presents hiding in the closet!
Merry Making!
Wednesday, July 19, 2017
Pantry Inspiration

We’re in the middle of a waiting game to start new projects at home. Over the weekend we went shopping for wood floors as we’re finally going to rip all the carpet out! We can hardly wait, although trying to pick a flooring is so DIFFICULT and taking longer than we ever expected! There are so many choices it makes me overwhelmed, but the process is fun and we are so excited to begin this BIG project. But as we wait to start that process, we’ve decided to overhaul our panty. We haven’t done anything to it since we moved in 3.5 years ago and it’s to the point where it’s always a mess, holds everything that doesn’t have a ‘home’ and a true annoyance. As I write, Finn just came out of the pantry wearing a piece from my canning kit because it was on floor after trying to rearrange the food for what seems like the millionth time.
We currently have the wire shelves that with too much weight in the middle begins to bow. Which ultimately means nothing heavy can be in the center. I also dislike the wire shelves for the simple fact that nothing sits flat. Everything wobbles or slides which can be dangerous when my little ones are trying to get snacks for themselves. We have already been to the doctor’s office once when Finn dropped a can on his toe last year. His nail in finally back to normal. SMH.
So as we measured the space and now plan exactly what we want to do build in order to make it as functional as possible for our family, I’m sharing a few of my favorite pantry inspiration pictures. I’m really hoping to install pull out drawers and have multitudes of shelf space for all my bakeware.

/SOURCE/

/SOURCE/

Monday, July 17, 2017
Take a Break

We spent most of our weekend outside enjoying as much family time as possible especially since we dragged the kids around trying to get as many errands done as possible on Friday. If you caught my stories on Instagram, Saturday was spent celebrating our dear friend’s 30th birthday. She is such a fun loving person! Only she would ring in her 30th by renting a giant inflatable water slide for all the kids and adults to enjoy! It’s definitely the most fun way to celebrate a birthday! #slidinginto30
Once we got home and put the kids to bed, it wasn’t long before they were all up from all the commotion of a thunderstorm. All snuggled on the couch, reading Kensi’s new favorite chapter books aloud eventually put everyone back to sleep and Mike and I were able to get a little shut eye before our alarms went off at 5:30am to start our new morning tradition of an early coffee date together. While sipping our hot coffee on our couch we opted to spend our Sunday morning getting out of routine and head to the beach. Lately, we’ve (mostly me) have been feeling overwhelmed and after reading Present Over Perfect by Shauna Niequist, we decided to strip away a lot of our extra curricular commitments for the next couple months and heading to the beach was exactly what our little family needed.


Once we got home and put the kids to bed, it wasn’t long before they were all up from all the commotion of a thunderstorm. All snuggled on the couch, reading Kensi’s new favorite chapter books aloud eventually put everyone back to sleep and Mike and I were able to get a little shut eye before our alarms went off at 5:30am to start our new morning tradition of an early coffee date together. While sipping our hot coffee on our couch we opted to spend our Sunday morning getting out of routine and head to the beach. Lately, we’ve (mostly me) have been feeling overwhelmed and after reading Present Over Perfect by Shauna Niequist, we decided to strip away a lot of our extra curricular commitments for the next couple months and heading to the beach was exactly what our little family needed.


We drove down to Oak Island for the first time. Usually when we go to the south beaches we make our way to Caswell Beach, just east of Oak Island beach, but we love trying new places and we found such a fun little area. Parking was a breeze since we left the house early and it was just feet away from the sandy beach and crashing waves. The kids were so excited to break away from our traditional Sunday morning routine and enjoy the natural beauty around us. The water was so refreshing and warm. The kids were more engaged in the water than ever before. Jumping over the waves, rolling in the sand and letting the water rush over them with each crashing wave. Kensi was in pure imagination heaven, playing mermaid and looking for shells. Finn was all about getting as many buckets of water as he could to fill his moats and destroy his sandcastles. Olivia was enthralled with splashing in the water, feeling the water run over her legs and eating as much sand as her two little fists could possibly shovel into her mouth!
As always we brought way too much sand home and even after vacuuming twice I’m still feeling the little sand granules all over the bathroom floor and throughout the kitchen and laundry room. We realize how easy it is to get caught up in everyday life, commitments and overwhelming chaos; and how important it is to re-prioritize, refocus on what really matters and that it’s okay to take a break, breathe and most importantly....play.
Friday, July 14, 2017
Friday Favorites: Pool Side

Happy Friday! Somehow our long summer days are blurring into weeks quickly passing by. The last few weeks we’ve been managing long days, teething babies, naps in the car, lots of popsicles and early risers. Summer is hard here. Sometimes it’s so blazing hot outside we spend the day inside, hiding out because not even the pool feels refreshing. But when we brave it out and spend our mornings and evenings poolside or running through the sprinkler, we remember just how good summer really is. This week’s favorites include all our summer must haves for this year and we hope you get the chance to try them and make them yours.


Intex Inflatable Pool | We purchased this from Target and it’s such a great small pool for our backyard. It’s the perfect size for the kids to play, jump and splash in. Not to mention it has cupholders and totally enough room for Mike and I sit inside with them! It definitely beats packing all three kids up in the car, drive to the pool and drag them back home.
Ryobi High Volume Inflator | Mike has had his eye on this tool for some time, but when we bought the inflatable pool we then went to pick the air pump up. I think this is my new favorite tool in the garage because it makes blowing the pool up each time a total breeze! It also has a small head attachment for those small air holes that are found on swim floats. Check it our HERE.
Cold Brew Floats | We never pass up a chance for ice cream, malts or floats. Mike and I are coffee addicts and we almost always have a coffee in hand when we’re out and about. For a fun summer twist we pour our favorite cold brew (currently STOK Black UnSweet) over vanilla bean ice cream. The ice cream becomes the cream and it’s the most delicious float. Add a splash of Kahlua for an adult drink. It’s quickly becoming my favorite summer afternoon drink and dessert.
Cilantro Avocado Dressing | One of our favorite things about summer has always been grilling. However here in coastal Carolina it’s sometime too hot to enjoy grilling. But on the days/nights we do grilled salad is one of our favorite dishes to make. Grilling romaine lettuce may make you raise your eyebrows, but we’ve been doing it for years and it’s so tasty! The flavor is completely different and added with a mix of grilled and raw veggies it makes for a hearty and filling salad. I came across Pinch of Yum’s version and after reading the recipe for her Cilantro Avocado dressing I just had to try it. I made a double batch and have been using it for so many different dishes. On top of a salad, shrimp, chicken or even as a dip for pita bread. It’s versatile, fresh and super healthy!
Inflatable Swan | This is such a trendy float, but I really do love it. I initially bought it because I thought it was cute, but it’s actually become our go to float for Olivia. I love using this one rather than the mesh one we use to have because the swan doesn’t allow her to put her face in the water. The only thing I miss is having a little canopy over the top, but we’re just sporting all the cute baby hats instead. Find it HERE.
Wishing everyone a fun filled summer lovin' weekend!
Monday, July 3, 2017
Kitchen Design: Open Shelves

Our little house projects have taken a back burner the last month since we were traveling and building a couple tables for friends, but somehow when we have an event planned, like a birthday party little projects tend to get done in the wee hours of the morning. This is exactly how we finally started and finished our open shelf project in our kitchen.
Over the last few years we’ve debated what we should do with the empty wall space above our peninsula. We always feel there is a lack of storage in our house and although it's a good space for our chalkboard, we continued to go back to the idea of adding open shelves. We really don’t know why we didn’t do this project sooner because not only did we gain extra storage, but the project itself was inexpensive and easy once we figured out a few small hiccups.
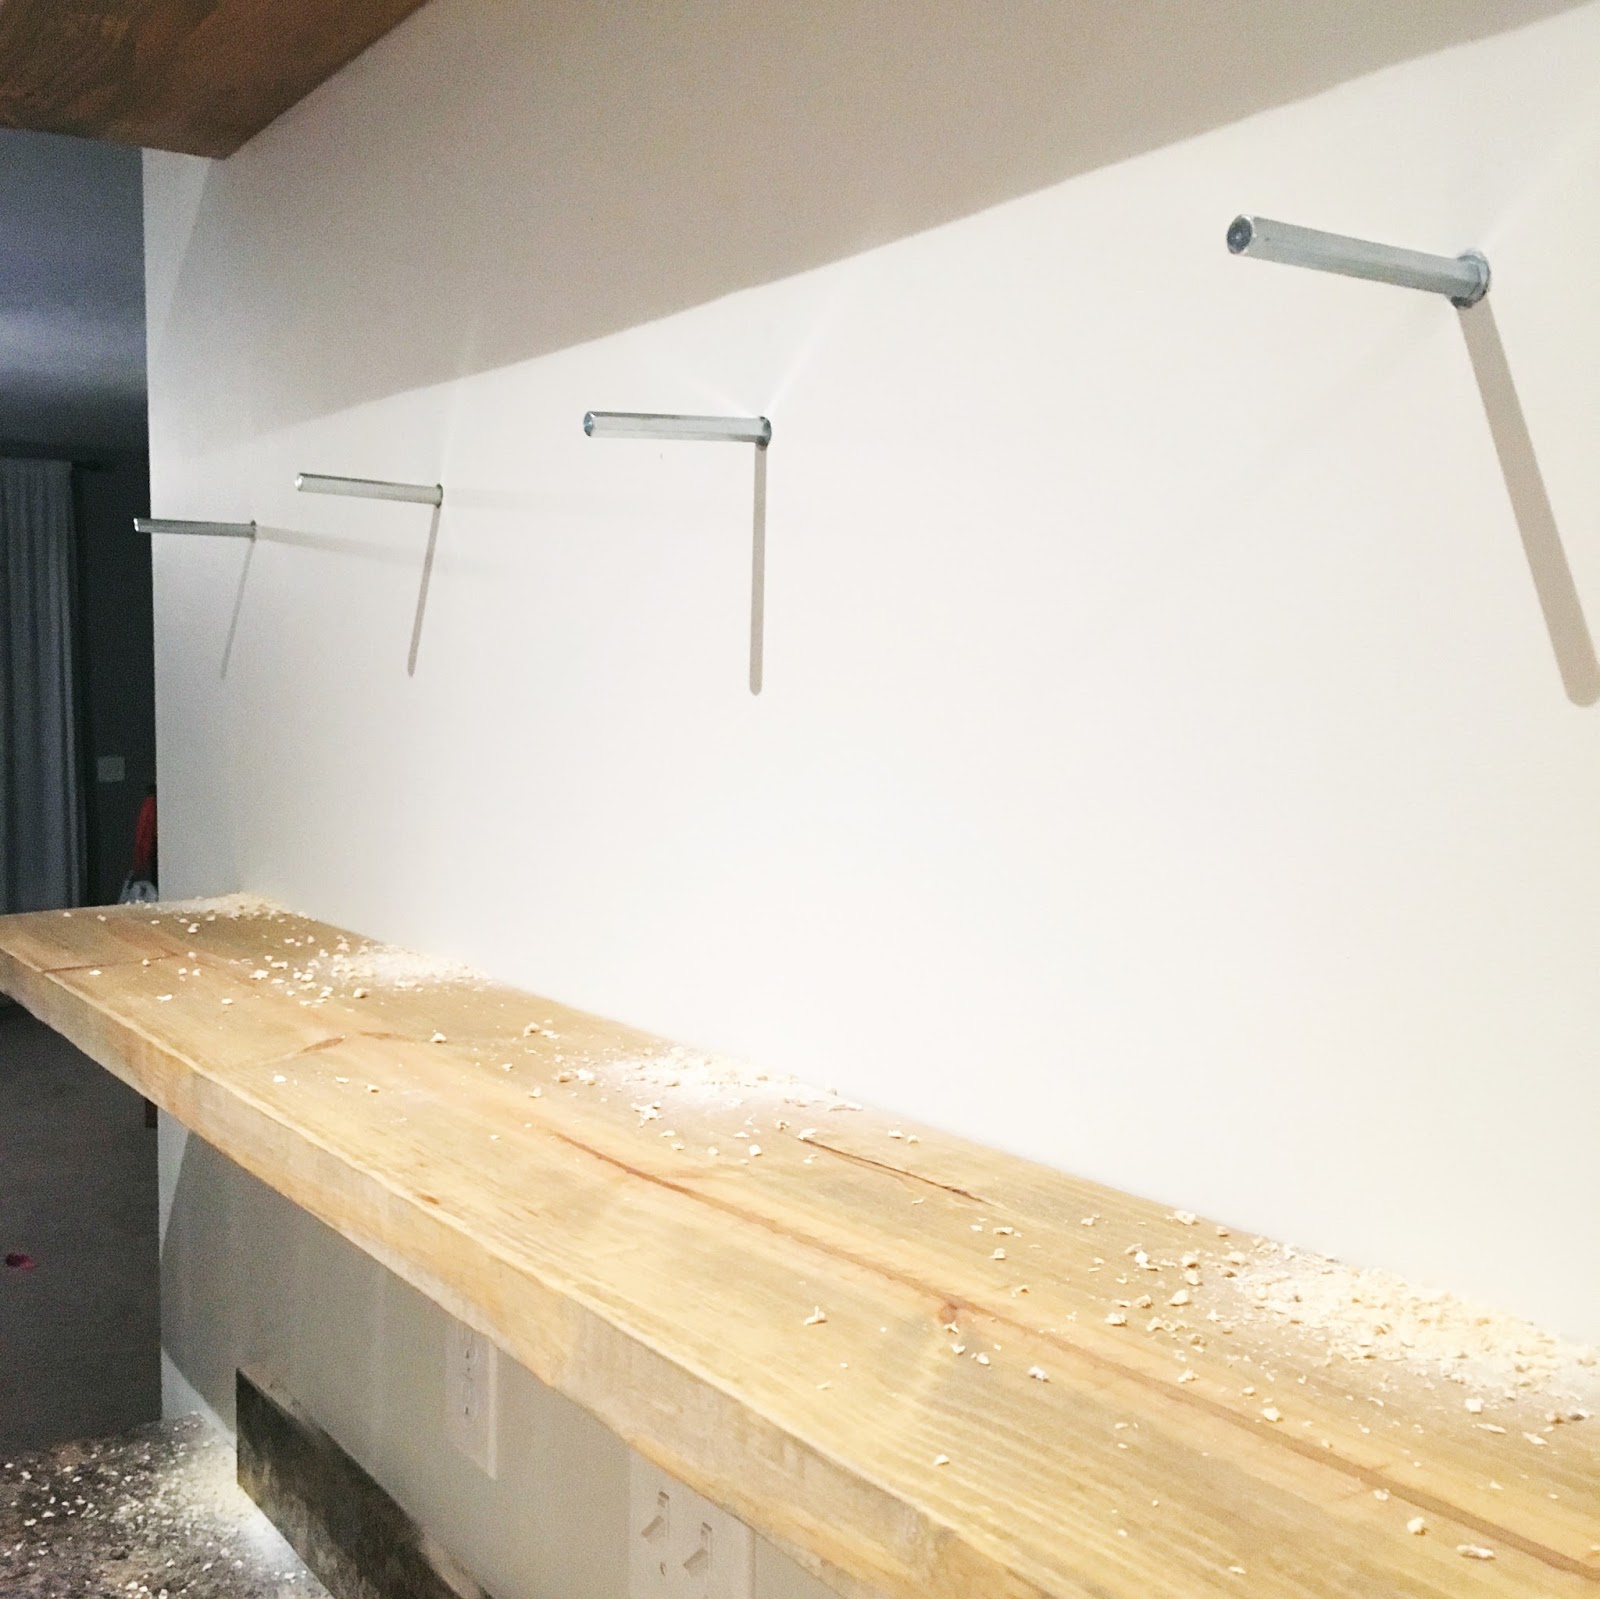
We originally began looking at brackets on Etsy with a budget of $200 for the entire project. We wanted the brackets to be hidden and we didn’t want to build the shelves from scratch by creating a box and sliding it onto 1X1 boards. The initial brackets we found were very pricey at $80 a piece and we knew we would only be able to afford to do two shelves. Nearly ready to dive into this big purchase we decided I would dig a little bit deeper and try to find other brackets that may work. My digging paid off and I found Dolle STRONGFIX Floating Shelf Brackets from Blue Stone Shelves. These brackets are sold in pairs and together can hold 88lbs. The best part is a set of the brackets cost a whopping $6.99. At this price point we were able to put in three shelves and ordered two sets of brackets per shelf.


Once the brackets were ordered, we purchased three 2X10 pine boards, cut them to length (we now have scraps for shorter shelves in another space for later!), sanded and stained them. I mixed Minwax Weathered Oak with a small amount of Minwax Jacobean and applied one layer of stain. Mike anchored each bracket into the studs on the wall making sure they were all in line using a laser level. Then, using a drill press, he made each hole into the 2X10 board for each bracket. Lastly, Mike slid each board onto the anchored brackets and used a rubber mallet to pound everything into place.
 We are so excited to finally be able to display our favorite glassware and kitchen accessories on the open shelves. It’s created more space and it’s opened up more space in our cabinets. We absolutely love the added shelves and it’s one more detail that has helped transform our kitchen space! On top of it all the cost of the project was awesome....
2x10 Pine Boards..........$24
Dolle Shelf Brackets.........$42
Minwax Stain.....$8
Project Total: $74
The whole project cost less than one set of the original brackets we were planning to purchase. Now, this is when waiting and digging does a project and diy-ers well!
Subscribe to:
Posts (Atom)
