

Projects/Tutorials
Thursday, July 9, 2020
printable chore charts
over the last few months our chore routine has become inconsistent. maybe this has happened in your home too. we’re not going anywhere, we’re not seeing anyone, the priority is still there, but it’s slid on the list of things to do. especially since we were out of town for several weeks and now we’re full blown into the summer months.
it actually dawned on me to revise our chore charts for summer, but the thought slipped away and then i saw someone on IG share a free printable and of course i lost that too. so i recreated what i saw and if anyone you know who created this original design please let me know so i can credit them. anyways...we are not super strict on chores and don’t want to make it something the kids dread, but understand that we are all part of this family and we all contribute and help each other. this chart is simple to act as a checklist as they can look and know what age appropriate chores can be done each day. we’re also notorious for the ‘oh i forgot to do (blank)’...you know how distractions can easily get the best of us.
so in an effort to find some kind of order again amongst the crazy i’ve added these charts below for you to print yourselves in case you need a little order in your life like me. happy friday!


Tuesday, April 7, 2020
Simple Potato Stamping


Seeking some spring inspired art fun? Potato stamping isn’t just an oldie, but it’s a goody and one that can be thoroughly enjoyed by all ages. If you have older kids have them help carve different designs and pictures into the potatoes using kitchen utensils, forks or a toothpick. The trick to good potato stamps is letting the potatoes dry out before using so they’re not too wet.
Materials Needed:
Potatoes
Sharp Knife
Tool to carve such as a toothpick, fork, or measuring spoon.
Paper towel
Paints
Paintbrush (optional)
Paper

Start by slicing potatoes in half and pat dry. If potatoes are really large, you may want to cut into thirds so smaller hand can hold them.
Next, use different kitchen utensils to carve shapes and pattern design into each potato slice. We used a tiny measuring spoon to create polka dots, a seafood pick to draw a bunny, rainbow and even zigzags. Once you have carved your design, lay each potato slice face down on a paper towel to let them dry for a few minutes while you get the paint ready.


To begin stamping dip each potato slice into desired color. If paint is a little thick you may want to blot it slightly or you can do what my kids did, they painted their potato surface. This was perfect for adding more than one color to each stamp. Then press potato down firmly on paper and lift. You now have a fun a unique design left behind.


Tuesday, September 10, 2019
Playroom Makeover

The playroom is the one room that has gone through the most makeovers. In the last 5 years it’s been painted four times. If you remember we’ve done the chalkboard wall, gray and white stripes, plain white and now this deep aqua color. I love changing up a room even if it’s multiple times for a couple reasons...
1) painting a room is one of the most inexpensive ways to completely change a space and
2) I truly believe your home should always be evolving with your style.
1) painting a room is one of the most inexpensive ways to completely change a space and
2) I truly believe your home should always be evolving with your style.
Prior to this weekend the playroom was painted a shade of white with a lot of white furniture. It’s safe to say white is my safety net because anything can go with it, but all the white on white was boring me and I needed a change. Cue a few of my favorite IG accounts, one in particular, Chris Loves Julia. In their last house they painted their den a beautiful dark and moody color and added accents of wood. It was gorgeous and I knew the playroom would be the perfect room to do something similar. This room has a large double window with lots of natural light and white colored furniture to pop.

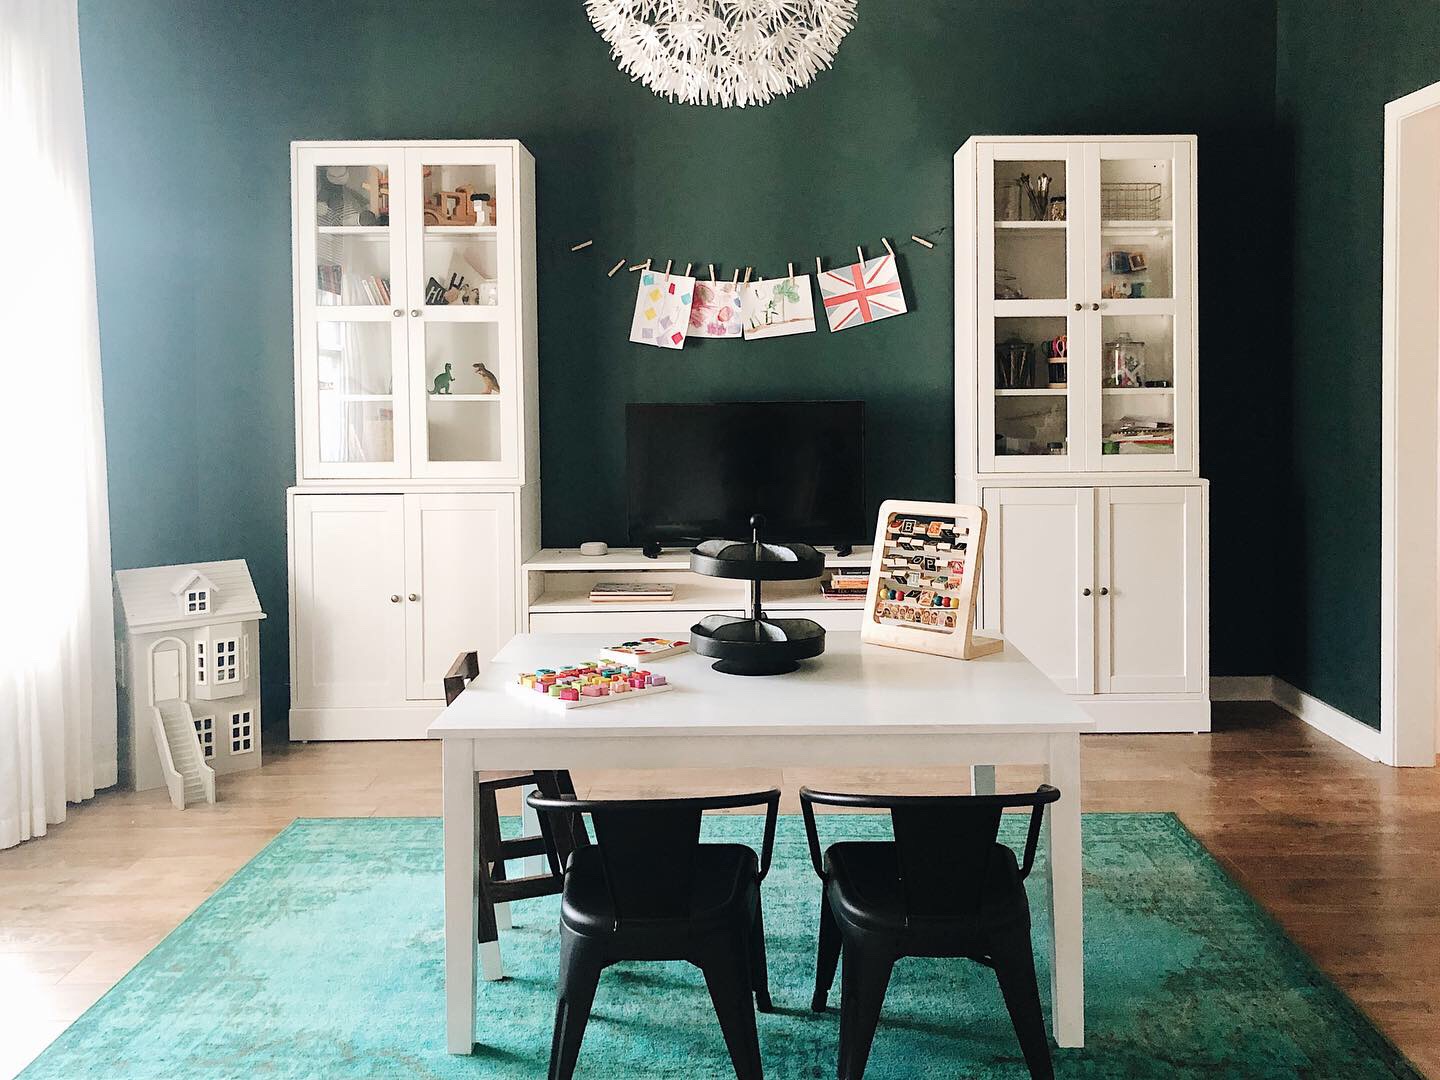


I absolutely love how our white furniture pieces pop against the new color. The cabinets we purchased from IKEA over the summer have become the focal point of the room, but they’ve also created so much storage for us. It houses so many of our playroom favorites including all our art supplies, block sets, puzzles and games. I planned to share more about our playroom favorites, but since I want to share more specific items with you I’m going to save that for its own post.
To completely finish the room we’re ordering an additional set of chairs and on the hunt for a different rug to bring in a little more contrast. The kids are definitely looking forward to more seating, but more than anything they love how this room has become more and more of a space for them and I’m excited to create a space they love!
\Sources\
Wall Color \ Sherwin Williams Still Water
Glass Door Cabinets \ IKEA
Play Kitchen \ Pottery Barn Kids
Rug \ Rugs USA
Chairs \ Target
Monday, June 24, 2019
A Princess Rapunzel Birthday

I will forever cherish planning each of our kids’ birthday parties. Every year they get so excited to begin planning and watching their ideas and vision come to life is pure magic.
This year Kensi wanted an Adopt a Princess party where her friends would each adopt a princess Itty Bitty. When we were shopping for the princesses we discovered Hallmark discontinued many of the plush dolls last December and it left us to find a different option. Kensi wasn’t even bothered by it and turned her focus on creating her party around her favorite princess, Rapunzel, and took much inspiration from the movie Tangled.
In true Kensi fashion she planned to have each of her friends paint their own paper lantern to replicate the floating lights in the movie. I seriously adore her style. We found concentrated water colors and the girls had so much fun painting their lanterns. Some painted pictures, while others painted patterns and rainbow designs. They turned out so cute! For the favor bags we were able to find enough keychain princess Itty Bitties in place of Kensi’s original plan and instead of adopting a princess, we simply added them to each guest's favor bag, along with a couple other fun treats.
Keeping our decor minimal with a white backdrop, we added pops of pinks, purples and gold to make her party come to life. We strung purple streamers from the ceiling that we dyed ourselves. It created a fun water colored ombre look that tied in perfectly with the water colors we used to paint the lanterns. We arranged a few different types of flowers in simple mason jars, added in copper twinkle lights and decorated the floor with scattered gold confetti filled balloons.
We had Whole Foods make her cake again this year and as always they nailed it! We went with a chocolate-raspberry filled cake and vanilla buttercream. They decorated it with the purple ombre effect and added in yellow for the floating lights. It was delicious and there was no cake left over which never happens. Kensi absolutely adored it and it may be my favorite cake her thus far!


\SOURCES\
Cake | Whole Foods
Paper Lanterns | Amazon
Portable Balloon Pump | Amazon
Balloons | Amazon
Streamers | DIY
Water Colors | Target
Paintbrushes | Hobby Lobby
Tablecloth | Amazon
Flowers | Trader Joes
Crown | The Wishing Elephant
Saturday, April 27, 2019
Laundry Room Renovation

Well, hello there beautiful! You gorgeous and functional laundry room, you! I’m so in love with how this space turned out and I can’t believe we let it go this long before we took on this project. Granted, we’ve been saving to do these bigger projects and even though I would have loved to have this done a few years ago, I can deeply appreciate the time, patience, sweat and tears that went into it. Yes, tears, there were tears due to the washing machine leaking all over the floor and going into the wall and staining our living room ceiling. There were tears when our AC in the attic leaked into the laundry room ceiling and we came upstairs to go to bed only to find water running out of the light fixture. This room has been the cause of multiple headaches that pushed this supposed month long project into a year, but we have finally walked through the process and we’re on the other side and completely in love with the finished results!
This space was as cookie cutter as it could get. Linoleum floors, flat paint, wire shelf, weird drain location and irritating water pan. It was crazy basic. Our laundry room is on the upper level of our home which is why our builder installed a water pan underneath the washing machine. About a month of moving into our home five years ago, our hand-me-down top loading wash machine leaked and I didn’t know. The water was sitting in the pan underneath the machine, but some of it also went under the pan, leaked around the unsealed drain (amateur plumbing) and went into our living room ceiling. It was a nightmare for a new homeowner. We had a plumber, contractor and drywaller all here within hours. I was most upset about the water pan because 1) it wasn’t installed properly 2) the drain wasn’t installed properly 3) our warranty guy tried to blame us for the damage because technically they’re not required to put a water pan in, but they did it anyways to be nice, athough we never requested one. A total nightmare. So our goal was to get rid of the water pan as soon as possible. We could have taken it out completely from the get go, but because the drain wasn’t properly installed or sealed it was not a project we wanted to take on until we were ready to make a big change.


We moved the drain over to be centered between the two machines and tiled the floor with penny tile. We initially planned to put subway tile up the entire back wall, but opted not to after looking at our overall budget and other projects we wanted/needed to take on in the house. I”m actually really happy with the decision to shiplap the entire room. It adds texture and keeps it simple without being boring. We decided to build a box around the machines in order to create a folding space on top. This is by far the BEST decision! Before the tops of our machines were constantly cluttered and there was zero room to fold anything. Now I can fold as I pull the clothes out of the dryer and it eliminates clothing piles for the kids to step over, trip on and ultimately cause me to refold again.
We added an upper cabinet for storage. Finished the space off by adding crown and adding two open shelves for easy access to our laundry essentials. I love having my products on open shelves, but I also like them to look pretty. Using glass jars and baskets help keep everything organized and pleasing to the eye. I especially love having cute little accent pieces in this space like the framed flower print I found at an antique store in Southport.
At one point we debated painting the crown molding black for a nice contrast. I loved the idea, but after dealing with multiple water leaks in different ceilings we were ready to just be done with this space and kept it simple and white. We may paint them later, who knows! Laundry can be such a chore and I actually spent quite a bit of time in this room so I wanted it to be pretty and a place I enjoyed. I love the details we added into this room. Now if I can just be more diligent about putting all the laundry away!
Here’s the space before.

\\ Sources \\
Wall Paint \ Super White Benjamin Moore
Trim Paint \ Super White Benjamin Moore
Cabinet \ Lowes Home Improvement
Penny Tile \ Home Depot
Stain \ Minwax Early American
Shelf Brackets \ Amazon
\\ Decor Sources \\
Flower Species Print \ Vintage
Rope Basket \ Target (similar item)
White Enamel Caddy \ Hobby Lobby
Jars \ Target
Lantern \ Target (similar items)
Towels \ Pottery Barn & Target
This space was as cookie cutter as it could get. Linoleum floors, flat paint, wire shelf, weird drain location and irritating water pan. It was crazy basic. Our laundry room is on the upper level of our home which is why our builder installed a water pan underneath the washing machine. About a month of moving into our home five years ago, our hand-me-down top loading wash machine leaked and I didn’t know. The water was sitting in the pan underneath the machine, but some of it also went under the pan, leaked around the unsealed drain (amateur plumbing) and went into our living room ceiling. It was a nightmare for a new homeowner. We had a plumber, contractor and drywaller all here within hours. I was most upset about the water pan because 1) it wasn’t installed properly 2) the drain wasn’t installed properly 3) our warranty guy tried to blame us for the damage because technically they’re not required to put a water pan in, but they did it anyways to be nice, athough we never requested one. A total nightmare. So our goal was to get rid of the water pan as soon as possible. We could have taken it out completely from the get go, but because the drain wasn’t properly installed or sealed it was not a project we wanted to take on until we were ready to make a big change.


We moved the drain over to be centered between the two machines and tiled the floor with penny tile. We initially planned to put subway tile up the entire back wall, but opted not to after looking at our overall budget and other projects we wanted/needed to take on in the house. I”m actually really happy with the decision to shiplap the entire room. It adds texture and keeps it simple without being boring. We decided to build a box around the machines in order to create a folding space on top. This is by far the BEST decision! Before the tops of our machines were constantly cluttered and there was zero room to fold anything. Now I can fold as I pull the clothes out of the dryer and it eliminates clothing piles for the kids to step over, trip on and ultimately cause me to refold again.
We added an upper cabinet for storage. Finished the space off by adding crown and adding two open shelves for easy access to our laundry essentials. I love having my products on open shelves, but I also like them to look pretty. Using glass jars and baskets help keep everything organized and pleasing to the eye. I especially love having cute little accent pieces in this space like the framed flower print I found at an antique store in Southport.
At one point we debated painting the crown molding black for a nice contrast. I loved the idea, but after dealing with multiple water leaks in different ceilings we were ready to just be done with this space and kept it simple and white. We may paint them later, who knows! Laundry can be such a chore and I actually spent quite a bit of time in this room so I wanted it to be pretty and a place I enjoyed. I love the details we added into this room. Now if I can just be more diligent about putting all the laundry away!
Here’s the space before.

\\ Sources \\
Wall Paint \ Super White Benjamin Moore
Trim Paint \ Super White Benjamin Moore
Cabinet \ Lowes Home Improvement
Penny Tile \ Home Depot
Stain \ Minwax Early American
Shelf Brackets \ Amazon
\\ Decor Sources \\
Flower Species Print \ Vintage
Rope Basket \ Target (similar item)
White Enamel Caddy \ Hobby Lobby
Jars \ Target
Lantern \ Target (similar items)
Towels \ Pottery Barn & Target
Thursday, March 22, 2018
Olivia’s Room

Olivia’s room has been a long time coming. Well every bedroom pretty much has been a long time coming and still counting as we constantly rearrange our upstairs. I’m so excited to have one of the bedrooms finished (other than adding crown). It’s everyone’s little retreat and thankfully Olivia doesn’t seem to mind.


The show stopper in Olivia’s room aside from the accent wall and my favorite piece is the beautiful Darling My Darling print. A fellow high school classmate and friend of mine, Ashley DuBois, created this print for her sweet daughter’s nursery. She very graciously shared her gorgeous art and I’m so thankful because it makes Olivia’s room.


For her room we kept things pretty simple, using a lot of what we already had, re-purposed different items and purchased only a few select new ones. We didn’t have a specific budget for this room, but we knew we wanted to keep the budget low and the room simple + beautiful. I think we accomplished exactly that!


Mike and I started by painting the once pink ceiling back to white and added the shiplap-like accent wall. We created the accent wall using 1/4 inch plywood ripped into 6 inch wide strips. We didn’t fill the nail holes as we wanted to keep all the imperfections of the wood. Our biggest debate was paint color. We went back and forth whether we were going to flip the wall colors: paint the shiplap the green and the rest of the room white. We’re so happy with our choice as the color on the walls makes the room so cozy!
Olivia’s windows really needed curtains and what I wanted was more than what we wanted to spend. I ended up purchasing IKEA curtains for $9.99 per set of two panels and picked up black pom pom trim from Hobby Lobby where I was able to use a 40% off coupon. I did a basic stitch on my sewing machine attaching the trim to each side of a panel. Compared to $100 per panel, ours cost us a total of $12.25 per panel. A great little DIY to save tons while still getting the look we wanted!
The show stopper in Olivia’s room aside from the accent wall and my favorite piece is the beautiful Darling My Darling print. A fellow high school classmate and friend of mine, Ashley DuBois, created this print for her sweet daughter’s nursery. She very graciously shared her gorgeous art and I’m so thankful because it makes Olivia’s room.


The last piece we want to add to Olivia’s room is crown molding. We haven’t been able to knock this off our to do list due to our current schedule, but hopefully we can cross this off the list very soon! We are so in love with her room and we would do it all over again! The total cost of her room came in just under $225 which mainly included paint, plywood for the wall, curtains, trim, and few a accessories such as her wall hooks and framed wall art!
\ Sources \
Shiplap Wall Color \ Sherwin Williams Eider White in Eggshell
Wall Color \ Benjamin Moore Templeton Gray in Eggshell
Swan Head Wall Decor \ Target
Curtains \ IKEA
Pom Pom Trim \ Hobby Lobby
Faux Sheepskin Rug \ Home Decorators
Crib \ The Honest Co. (no longer available) but similar HERE
Crib Sheet \ Little Unicorn
Berry & Bloon Quilt \ Little Unicorn
Darlling My Darling Print \ Ashley DuBois Design & Branding
Star Garland \ Hooray Everyday
Frame \ Hobby Lobby
Dresser Knobs \ Hobby Lobby
Wall Hooks \ Hobby Lobby
Lion Rocker \ Crate&Kids (formerly Land of Nod)
Subscribe to:
Posts (Atom)
