

Monday, July 3, 2017
Kitchen Design: Open Shelves
Our little house projects have taken a back burner the last month since we were traveling and building a couple tables for friends, but somehow when we have an event planned, like a birthday party little projects tend to get done in the wee hours of the morning. This is exactly how we finally started and finished our open shelf project in our kitchen.
Over the last few years we’ve debated what we should do with the empty wall space above our peninsula. We always feel there is a lack of storage in our house and although it's a good space for our chalkboard, we continued to go back to the idea of adding open shelves. We really don’t know why we didn’t do this project sooner because not only did we gain extra storage, but the project itself was inexpensive and easy once we figured out a few small hiccups.
We originally began looking at brackets on Etsy with a budget of $200 for the entire project. We wanted the brackets to be hidden and we didn’t want to build the shelves from scratch by creating a box and sliding it onto 1X1 boards. The initial brackets we found were very pricey at $80 a piece and we knew we would only be able to afford to do two shelves. Nearly ready to dive into this big purchase we decided I would dig a little bit deeper and try to find other brackets that may work. My digging paid off and I found Dolle STRONGFIX Floating Shelf Brackets from Blue Stone Shelves. These brackets are sold in pairs and together can hold 88lbs. The best part is a set of the brackets cost a whopping $6.99. At this price point we were able to put in three shelves and ordered two sets of brackets per shelf.


Once the brackets were ordered, we purchased three 2X10 pine boards, cut them to length (we now have scraps for shorter shelves in another space for later!), sanded and stained them. I mixed Minwax Weathered Oak with a small amount of Minwax Jacobean and applied one layer of stain. Mike anchored each bracket into the studs on the wall making sure they were all in line using a laser level. Then, using a drill press, he made each hole into the 2X10 board for each bracket. Lastly, Mike slid each board onto the anchored brackets and used a rubber mallet to pound everything into place.
 We are so excited to finally be able to display our favorite glassware and kitchen accessories on the open shelves. It’s created more space and it’s opened up more space in our cabinets. We absolutely love the added shelves and it’s one more detail that has helped transform our kitchen space! On top of it all the cost of the project was awesome....
2x10 Pine Boards..........$24
Dolle Shelf Brackets.........$42
Minwax Stain.....$8
Project Total: $74
The whole project cost less than one set of the original brackets we were planning to purchase. Now, this is when waiting and digging does a project and diy-ers well!
Over the last few years we’ve debated what we should do with the empty wall space above our peninsula. We always feel there is a lack of storage in our house and although it's a good space for our chalkboard, we continued to go back to the idea of adding open shelves. We really don’t know why we didn’t do this project sooner because not only did we gain extra storage, but the project itself was inexpensive and easy once we figured out a few small hiccups.

We originally began looking at brackets on Etsy with a budget of $200 for the entire project. We wanted the brackets to be hidden and we didn’t want to build the shelves from scratch by creating a box and sliding it onto 1X1 boards. The initial brackets we found were very pricey at $80 a piece and we knew we would only be able to afford to do two shelves. Nearly ready to dive into this big purchase we decided I would dig a little bit deeper and try to find other brackets that may work. My digging paid off and I found Dolle STRONGFIX Floating Shelf Brackets from Blue Stone Shelves. These brackets are sold in pairs and together can hold 88lbs. The best part is a set of the brackets cost a whopping $6.99. At this price point we were able to put in three shelves and ordered two sets of brackets per shelf.
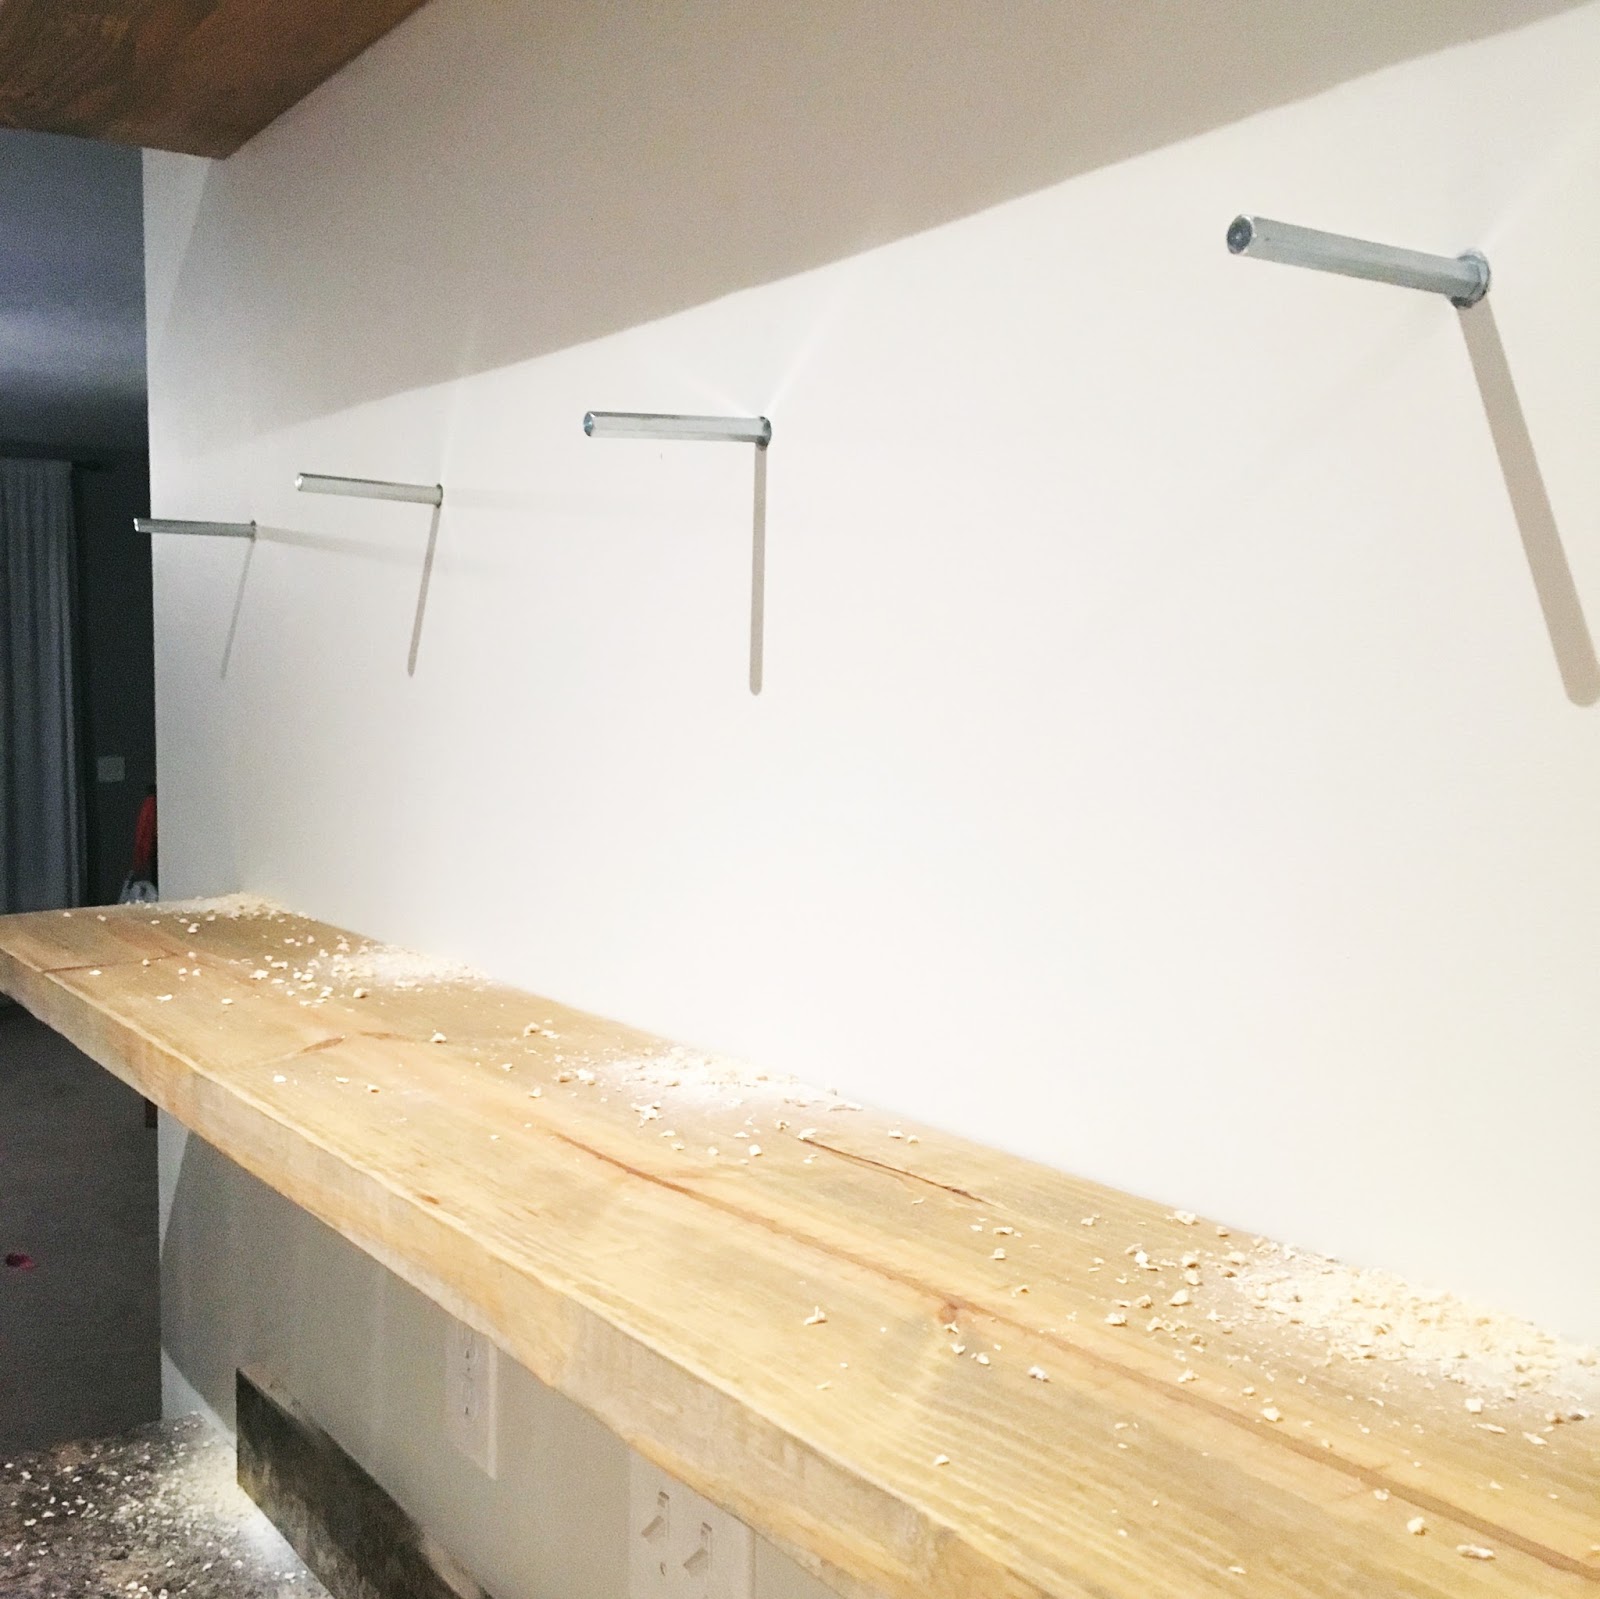


Once the brackets were ordered, we purchased three 2X10 pine boards, cut them to length (we now have scraps for shorter shelves in another space for later!), sanded and stained them. I mixed Minwax Weathered Oak with a small amount of Minwax Jacobean and applied one layer of stain. Mike anchored each bracket into the studs on the wall making sure they were all in line using a laser level. Then, using a drill press, he made each hole into the 2X10 board for each bracket. Lastly, Mike slid each board onto the anchored brackets and used a rubber mallet to pound everything into place.
 We are so excited to finally be able to display our favorite glassware and kitchen accessories on the open shelves. It’s created more space and it’s opened up more space in our cabinets. We absolutely love the added shelves and it’s one more detail that has helped transform our kitchen space! On top of it all the cost of the project was awesome....
2x10 Pine Boards..........$24
Dolle Shelf Brackets.........$42
Minwax Stain.....$8
Project Total: $74
The whole project cost less than one set of the original brackets we were planning to purchase. Now, this is when waiting and digging does a project and diy-ers well!
Friday, June 30, 2017
Watermelon 5 Ways

Summertime calls for lots of water play, sunshine and at our house, lots of watermelon. I love keeping it on hand for an easy, healthy go to snack when the kids need to hydrate from all the outside time in the heat. Slicing it up into triangles is the easiest, but also the messiest. Kensi loves putting it on a popsicle stick and Finn loves it in a drinkable form more than anything. To me, watermelon is the most iconic summer food and goes so well with BBQ’s, poolside or around a campfire.
Frozen Watermelon Coolers | Finn is king of smoothies, juices and all things drinkable. Sometimes he isn’t enthused to eat a regular slice of watermelon, but he’s always excited to have it blended. I love putting it into our electric ice cream maker and blending it just until become slushy. It’s perfect for hot summer days. We also enjoy adding lemonade, check out our recipe from last year HERE.
Watermelon Pizza | The kids love dressing up large watermelon slices with shredded coconut, sliced almonds + blueberries and drizzling it with honey. It’s a super sweet way to make dessert into a healthy summertime treat for everyone!
Watermelon Mojitos | Mike and I love a good margarita, but sometimes they can be too sweet, so our go to summer cocktail is the mojito. We love the juicy flavor of the watermelon paired with the freshness of the mint, straight from our garden! We particularly love recipes without all the watermelon pulp, getting it stuck in a straw is no fun and who really wants to see you slurping pieces out of a glass? We tried a few different recipes and tweaked things to create our perfect watermelon mojito. These go down so easily, but we hope you try it and enjoy it as much as we do!
Makes 4 drinks...
In a saucepan on low heat make a watermelon syrup by adding 1-1/4 cups watermelon cubes, 1/4 cup agave nectar, 1/2 cup mint leaves and the juice of 4 limes. Muddle with a wooden spoon until mixture is combined well and warmed through. Remove from heat, let cool and strain.
To make the mojito, place 4 mint leaves in the bottom of each glass and muddle to release oils. Then, to each glass add 2oz watermelon syrup, 2oz Rum and 2 to 3oz Club Soda. Stir, add ice and garnish with watermelon slice and mint leaves.
Watermelon Fruit Leather | We attempted to make fruit leather for the first time a couple weeks ago and our first batch was a huge fail! I made it on parchment paper and it was just a mess. I have yet to try again using a silicone baking mat and hoping it will turn out better. Aside from the parchment paper, my other struggle was how much water makes up watermelon and I didn’t add any sugar. #momfail So after reading other recipes I recommend 1 cup of sugar for every 10 cups of cubed watermelon. I’ve always wanted to make it with the kids, but always felt intimidated and my first batch was a reason as to why. Nonetheless, the kids had a blast helping blend everything in the food processor and we can’t wait to try again!
Watermelon Sparklers | These are perfect for celebrating all three of our summer holidays (Memorial Day, Independence Day & Labor Day) and all summer long. The kids love when we cut our food into fun shapes and these sparklers are so festive! Start by skewering blueberries on a wooden skewer. Use a star cookie cutter and cut our of a slice of watermelon and place on top of skewer over the blueberries. Two of the kids’ favorite fruits put together is always a win for our family.
Hoping you try some of these fun recipes this upcoming holiday week!
Hoping you try some of these fun recipes this upcoming holiday week!
Wednesday, June 28, 2017
Omaha: Part 2

Kensi and Finn loved venturing around their grandparents’ homes, both live on acreages. Kensi and Finn loved running and rolling through the grass as they both said it was so soft compared to what we have at home. Kensi also said it was so awesome to not have to worry about fire ants, lizards, snakes and alligators. We live around a lot of predators here. Hearing how excited she was about the simplest things such as the grass made me feel sad, like they’re missing out on things we grew up only knowing. We were constantly outside exploring and going on adventures. Whereas here before I let the kids out to the yard I scan everything for snakes, spiders and fire ants.
We spent a day at the Henry Doorly Zoo, one of our favorite places in Omaha, with Mike’s mom and brother, Matt. We were so excited to finally see the new African Sahara exhibit and it definitely didn’t disappoint. What a huge difference this exhibit has made in terms of the animal enclosures, especially for the elephants and cats. We could have stayed and watched the lions and cheetahs for hours as it was fascinating seeing them in a more natural habitat. Kensi and Finn loved the aquarium, butterfly garden and giraffes. We had lunch and Olivia had her first taste of frozen lemonade. Of course she LOVED it and it was the perfect fix to cool down from the heat. We didn't make our way down to the farm exhibit, but will definitely plan to go there on our next visit.
We spent a day at the Henry Doorly Zoo, one of our favorite places in Omaha, with Mike’s mom and brother, Matt. We were so excited to finally see the new African Sahara exhibit and it definitely didn’t disappoint. What a huge difference this exhibit has made in terms of the animal enclosures, especially for the elephants and cats. We could have stayed and watched the lions and cheetahs for hours as it was fascinating seeing them in a more natural habitat. Kensi and Finn loved the aquarium, butterfly garden and giraffes. We had lunch and Olivia had her first taste of frozen lemonade. Of course she LOVED it and it was the perfect fix to cool down from the heat. We didn't make our way down to the farm exhibit, but will definitely plan to go there on our next visit.


Mike and I also took the kids to the Omaha Children’s Museum on St. Mary’s Street. This is one of my favorite spots in Omaha for family fun. We’ve been to a few different children’s museums including St. Louis, Charlotte and Baltimore and this one is great for little kids. It’s not huge, but it is very clean and has a lot to keep kids entertained for a few hours. This was one of Mike’s first visits and he was my fourth child. He loved the engineering room and it was hard to pull him away from all the contraptions. Kensi had her first experience with a mean girl in the kitchen play area where in the middle of making a pizza, it was completely swiped from her even after trying to use her words to let the other girl know she was playing it. It didn’t matter and the girl responded, “not anymore! I am!” This was my first time watching something like this unfold on my own child and my Mama Bear wanted to come out. Not only was it heartbreaking to watch Kensi just break, but the parents were sitting right there, chatting with other parents and didn’t say a word! Needless to say we moved on and found the window painting room.
This visit was especially fun, because on the second level where exhibits change throughout the year based on theme, it was a dinosaur dig. Kensi and Finn loved digging for fossils, putting bones together and climbing on the large dinosaurs.We rode the carousel and sat through a science presentation about bubbles, how they’re made, why they form and what shapes they can make! We all had a blast and can’t wait to go back.


In between running through the fields and running around Omaha, we stopped at a few of our favorite local restaurants like Mama’s Pizza and Blue, celebrated a birthday and of course spent some time in the pool with cousins. However, it just wouldn’t feel right without some sort of project so Mike and I planted my parents’ garden and installed a timed watering system to make it tending the garden easier for them. This trip was one of our best trips back and it was very difficult saying ‘later’ to everyone. Kensi had the hardest time because she really didn’t want to leave. Living away from family is so incredibly difficult. It’s easier to try not to think about it, but ultimately that just means I’m putting on a strong face every day, because when the kids ask why we can’t celebrate our birthdays with cousins and grandparents, or why we don’t have family come over for holidays, I have to. This trip tugged on my heartstrings. I miss our family. I miss our hometown. I miss our friends. I miss familiarity. Of course living away is an adventure I never intended to have and it truly is amazing. Until next time Omaha...
Family Fun
Henry Doorly Zoo
Omaha Children’s Museum
Memorial Park
The Durham Museum
Eugene T. Mahoney State Park
Conservation & Wildlife Safari Park
Favorite Restaurants
Blue Sushi Sake Grill
Roja Grill
Mama’s Pizza
Stokes
La Casa’s Pizzaria
J.Coco
Family Fun
Henry Doorly Zoo
Omaha Children’s Museum
Memorial Park
The Durham Museum
Eugene T. Mahoney State Park
Conservation & Wildlife Safari Park
Favorite Restaurants
Blue Sushi Sake Grill
Roja Grill
Mama’s Pizza
Stokes
La Casa’s Pizzaria
J.Coco
Monday, June 26, 2017
Rainbow Painting Party

Kensi’s birthday party was so much fun to plan. For a few months leading up to her birthday she changed her mind about the party theme approximately six times, and that may be an understatement. We finally settled on a rainbow themed painting party, combining her love of all things art and rainbows. We dove into Pinterest to get some inspiration and she adored all the rainbow balloon arches, so we knew that was a must have. I’m so happy Kensi takes part in party planning with me, because it’s so neat to see her personality shine through with each birthday party we plan. Mike and I were in complete rush mode Saturday morning trying to get everything today and failed to photograph the details like we wanted. However, we kept everything simple as we always try to do and the party was a total hit!


I purchased nearly all our party decor and favors from my favorite go to party shop, Sweet LuLu and the remaining items came from Target and Hobby Lobby. Keeping it simple is always key, it’s very easy for me to get carried away with too much stuff and it becomes overwhelming and cluttered.
The painting part of the party turned out well! We invited siblings so we anticipated the young ones to paint, but they didn’t. All the little boys ended up running around and playing with cars. I purchased 10x10 sized canvas' for the girls and supplied a variety of fun + pretty paints. I love the selection of paints from the art aisle at Target, but they are acrylic, so we provided everyone with a shirt to wear over their clothes in case they got messy. The best part of this theme was seeing each of the girls’ creativity come to life on their canvas. A couple girls were inspired by the rainbow ballon arch and painted their own rainbows, whereas others created their own Picasso and another a true art abstract that included a door. It’s rare anymore for kids to truly be able to create something completely theirs, in their own free space. It was pretty neat to watch.
For food, we kept everything small and fun with mini chicken & waffles drizzled with syrup, mini wrapped corndogs, layered fruit cups and cake. The kids sipped on lemonade and I completely forget to pull out the popsicles. All the kids enjoyed their munchies and it really couldn’t have been more simple.
Kensi had an absolute blast celebrating her birthday with her closest friends. Everyone played inside and outside regardless of the heat. Unfortunately, one of the kids endured a wasp sting, but luckily we were able to treat her immediately and after a little bit she was able to join back in on the fun. We are so grateful for the community of friends we’ve been able to be a part of through our kids. They are some of the most caring and kind families we’ve ever come across and we know our kids are forever blessed to have them celebrate all their big celebrations.
Scroll down for the simple recipes and sources!
Chicken & Waffles
Mini Toaster Waffles
Baked Popcorn Chicken
Sandwich one popcorn chicken, between two mini waffles. Hold together with a toothpick and drizzle with favorite syrup or honey.
Mini Corndogs
All Beef Hotdogs, sliced into 8 rounds
1 package Crescent Rolls, seams pressed together, then sliced 8 ways in each direction, making 64 pieces.
Wrap a crescent roll piece around a mini hotdog slice. Press ends together and bake at 350 F for eight to nine minutes. Serve with favorite hotdog toppings.
Kensi had an absolute blast celebrating her birthday with her closest friends. Everyone played inside and outside regardless of the heat. Unfortunately, one of the kids endured a wasp sting, but luckily we were able to treat her immediately and after a little bit she was able to join back in on the fun. We are so grateful for the community of friends we’ve been able to be a part of through our kids. They are some of the most caring and kind families we’ve ever come across and we know our kids are forever blessed to have them celebrate all their big celebrations.
Scroll down for the simple recipes and sources!
Chicken & Waffles
Mini Toaster Waffles
Baked Popcorn Chicken
Sandwich one popcorn chicken, between two mini waffles. Hold together with a toothpick and drizzle with favorite syrup or honey.
Mini Corndogs
All Beef Hotdogs, sliced into 8 rounds
1 package Crescent Rolls, seams pressed together, then sliced 8 ways in each direction, making 64 pieces.
Wrap a crescent roll piece around a mini hotdog slice. Press ends together and bake at 350 F for eight to nine minutes. Serve with favorite hotdog toppings.
\\ SOURCES \\
Canvas' | Hobby Lobby
Paints | Target
Brushes | Hobby Lobby
Sprinkles | Shop Sweet Lulu
Balloons | Shop Sweet Lulu
Cups + Paper Straws | Shop Sweet Lulu
Subscribe to:
Posts (Atom)
